

Today, everyone, everywhere in the Angular community is talking about Signals. They are the new way to manage state and reactivity in Angular applications, promising a better way to build logic and a very much improved change detection.
However, many are hesitant. And this is understandable! Not only are signals new, but they also require a somewhat different way of thinking as opposed to the common way of dealing with reactivity (without RxJS). And even with RxJS, many question need our attention before we cna actually move in and start using signals in our day-to-day operations.
So, what are those questions that we aim to answer with this article? Let's take a look
- Are signals going to replace RxJS? Is RxJS "dead"?
- Should I migrate to signals? What are the benefits?
- If so, how should I migrate? This feels overwhelming!
- If I do, when should I use signals and when RxJS?
Let's go one by one and try to answer these questions, and, hopefully, learn something new along the way.
Are signals going to replace RxJS?
This is probably the most common question everyone is asking nowadays. WHich is understandable, given both approaches kind of solve the same problems (state management and reactivity) and are both used in Angular applications.
To answer this, let us begin with the official position of the Angular team: RxJS is going to be optional. Now, optional is a specific word. It means it will not be required, but it will definitely be supported. So what does that mean in practice?
Well, materially, the actual support for RxJS improved with the latest version. For example, we go the takeUntilDestroyed custom operator to help us unsubscribe easier from our Observables. On top of that, we now have the @angular/core/rxjs-interop package that also allows us to play signals together with RxJS. So, the correct answer here is no, RxJS is not going to die.
Moreover, this year a big step has been taken to make Observables native in browsers: Chromium-based browsers now support an experimental, native version of Observables. This only can mean that in the future reactive extensions (even if not in the form of RxJS) will become more ubiquitous, not less.
So, this is more or less the answer to our first question: no, RxJS is not dead, and is not planning to become dead anytime soon, and when it comes to Angular, the support for it has improved, it is just that it will be optional and many tasks can be completed with signals instead. Which naturally brings us to the next question.
Should I migrate to signals?
Now this one is a bit tricky. Signals are way simpler as opposed to RxJS, but also have a learning curve, so we must justify moving away (in some cases!) from RxJS. Let's shortly recap what benefits signals bring to the table.
- Synchronous: Observables can be asynchronous, which can add to the overall confusion. Signals, on the other hand, are guaranteed to be synchronous, meaning no race conditions and other unpleasant surprises. (of course this also means they are unsuited for dealing with async things directly, but we are listing benefits here don't we?)
- Always available value: with Observables, we need to subscribe in order to be able to read the latest "value", we can always simply call them (
mySignal()) and get the current value immediately. - Simplicity: In RxJS, we have multiple powerful operators and other concepts such Schedulers, hot and cold Observables, Subjects, etc. Signals have a very thin API layer, providing the bare minimum building blocks to handle everything we need in terms of
- Built for Angular: while we discussed the improved RxJS interoperability in Angular, signals are built specifically for Angular, meaning they are designed to work with the framework's change detection seamlessly. Updating a signal's value already triggers change detection, making them essential for Zoneless Angular apps.
Now, if this got us convinced that we want, in fact, to migrate to signals, we can move to the next question: how do we do that?
How should I migrate to signals?
To correctly address this question, we need to first understand that this migration won't happen overnight (unless we have a really tiny app). However, we also can realize that changing one component property from an Observable (or even better, a conventional property like a string or boolean) to a signal is not that hard, and, crucially, most likely won't affect the overall component logic.
This gives us the understanding that we can start migrating to signals in an incremental, one-by-one fashion. Let's now outline the important steps and then deconstruct all of those steps further.
- Easy steps: migrating input/output properties and view/content queries
- Migrating simple properties: primitive values can be dealt with here and there
- Migrating object properties: this is where things can get a bit more complicated, but still manageable
- Migrating
BehaviorSubjects: also can be done easily, but a degree of care should be shown - Migrating other Observables: really depends on the case, and mostly involves removing
asyncpipes in favor oftoSignal, rather than actually changing the Observable in question to a signal
So, let's discuss all these points!
Migrating inputs/outputs and view/content queries
As we known, in recent versions, Angular has introduced the input and output functions, which replace the previous @Input and @Output decorators. The input function in particular produces a signal, so it can be used with all sorts of building blocks like computed, effect and now also linkedSignal.
So, for instance, if we have such a component:
@Component({
  selector: 'my-dialog',
  template: `...`,
})
export class MyDialogComponent {
  @Input() open: boolean;
  @Output() close = new EventEmitter<void>();
}
We can now safely migrate it to signals like this:
@Component({
  selector: 'my-dialog',
  template: `...`,
})
export class MyDialogComponent {
  open = input.required<boolean>();
  close = output<void>();
}
Now, we are not going to dive into all the intricacies of having inputs and outputs as signals, so you can consult the official documentation here and here for that.
However, what actually concerns us, is the big scale of such a migration: in a decent enterprise-grade app we might very well have hundreds of component with thousands of inputs that would be almost impossible to convert manually.
Thankfully, the Angular team got us covered (as much as possible), with a special migration schematic we can run and easily convert most (if not all) of our inputs and outputs. We can simply run
ng generate @angular/core:signal-input-migration
And all of the inputs/outputs that are safe to convert will be automatically converted, and if they are referenced somewhere, the reference would be updated to actually call the signal (reading its value), even in templates and host bindings.
Now let us discuss what "safe to convert" means. For instance, the schematic might not convert inputs that are being re-set in the component, as signal inputs are immutable, so we cannot change their value after the initial assignment, only parent components can. This is a good thing, as it helps us avoid bugs, but it also means that we need to be careful when migrating such inputs:
@Component({
  selector: 'my-dialog',
  template: `...`,
})
export class MyDialogComponent {
  @Input() open: boolean;
  @Output() close = new EventEmitter<void>();

  closeDialog() {
    this.open = false; // this will not work if input is a signal
    this.close.emit();
  }
}
There's a way to force the schematic to do a bit more and convert slightly unsafe inputs:
ng generate @angular/core:signal-input-migration --best-effort-mode
However, you should be careful with this, as it could break your build, so always double-check.
Now, after doing the migration, we need a way to circle back later and manually migrate inputs that were not converted. For this, when running the migration, we can use an --insert-todos flag, which will insert TODO comments in the code where manual migration is required. This way, we can easily find those places later and fix them. For example:
@Component({
  selector: 'my-dialog',
  template: `...`,
})
export class MyDialogComponent {
  // TODO: Skipped for migration because:
  //  Your application code writes to the input. This prevents migration.
  @Input() open: boolean;
  close = output<void>();

  closeDialog() {
    this.open = false; // this prevented it
    this.close.emit();
  }
}
Another small case could be if we use getters as means to read inputs and do some side-effects or convert to another value. Here, we would be forced to also come in manually and change those to either be an effect or computed` instead in the future.
Next, if we have a truly huge application we might consider doing even the automatic migration incrementally; for this, we cna provide a path to the schematic and only convert a part of our app at a time, test it, ship it, then come back for the next slice:
ng generate @angular/core:signal-input-migration --path=src/app/some/feature
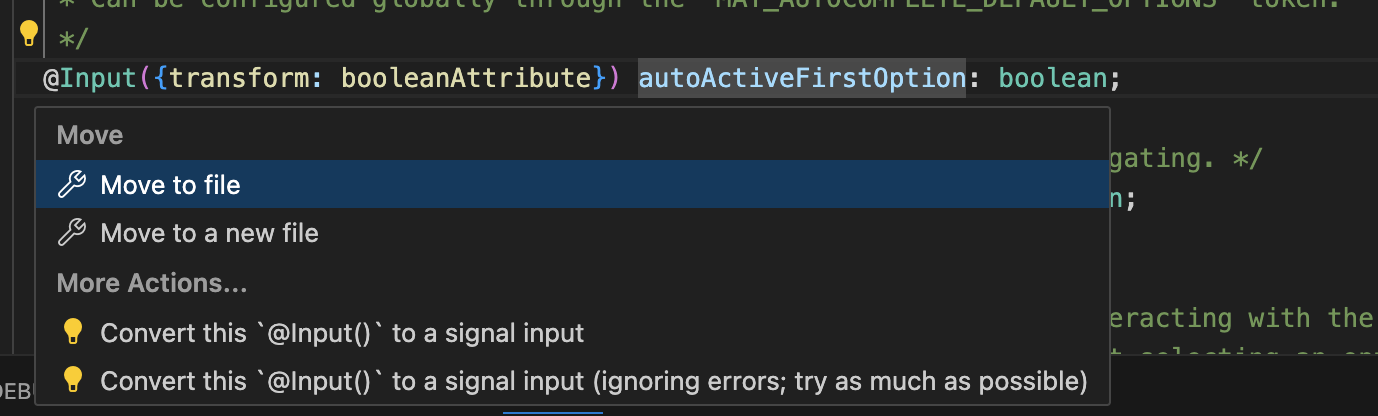
It is worth noting, that even the manual migration does not have to be painful: there's a VSCode code refactor action available that can convert an @Input or @Output to a signal, after which we can manually hone any remaining edge cases.
Everything we mentioned here is actually the worst case scenario; we can run a migration for outputs separately, which is way safer:
ng generate @angular/core:signal-output-migration
Since it is safe, it does not include a --best-effort-mode flag, and it does not insert TODOs, as it is guaranteed to work. It also handles cases where the legacy EventEmitter's next method is used, and removes calls to EventEmitter.complete, since it is unnecessary.
Finally, we must say that we can also run a migration schematic to change view and content queries to signals, which might also be unsafe, so --best-effort-mode is available here as well:
ng generate @angular/core:signal-queries-migration
This will do! When we have our inputs, outputs and queries migrated, we can move to the next step.
Migrating simple properties
Now, when we have inputs and outputs and other things that might naturally be signals, we now arrive at a territory where we need to go manual, however still keeping things relatively simple. Imagine we have a property in our component that is a simple primitive value, like a string or boolean. We can simply change it to a signal, and then use it as such:
@Component({
  selector: 'some-component',
  template: `
    <app-dialog [open]="open"/>
    <button (click)="toggleDialog()">Toggle Dialog</button>
  `,
})
export class MyComponent {
  open = false;

  toggleDialog() {
    this.open = !this.open;
  }
}
Now, such a signal can easily be converted to a signal, and we can use it in the template as well:
@Component({
  selector: 'some-component',
  template: `
    <app-dialog [open]="open()"/>
    <button (click)="toggleDialog()">Toggle Dialog</button>
  `,
})
export class MyComponent {
  open = signal(false);

  toggleDialog() {
    this.open.update((value) => !value);
  }
}
This is very straightforward! Basically, we have to keep several simple things in mind:
- Change a property to be a signal of a value instead of the value itself ('true' -> 'signal(true)')
- Change update logic from simple assignment to using the
updateorsetmethods of the signal:this.open = !this.open->this.open.update((value) => !value)
- Do not forget to call the signal in the template as a function:
open->open() - If your signal is bound to
[(ngModel)], do not call it in the binding, just use it as is:[(ngModel)]="open"->[(ngModel)]="open"
This was easy. Now, doing the same with complex values (like deeply nested objects and arrays) can be a bit trickier.
Migrating complex properties
Now, with complex properties as signals, the manual steps are still the same, we just keep in mind that usually we would mostly use .update instead of .set (although not exclusively), as it is convenient when dealing with properties, like adding an item to an array:
arraySignal.update((array) => [...array, newItem]);
Now, what can become frustrating here is using these methods with objects of considerable size and depth. Imagine we have a state signal that contains various items, one of which is a product object, which has a orderHistory array, which contains order objects, which have a quantity property. Now imagine updating that property for the third order:
state.update((state) => {
  return ({
    ...state,
    product: {
      ...state.product,
      orderHistory: state.product.orderHistory.map((order, index) => {
        if (index === 2) { // third order
          return {
            ...order,
            quantity: order.quantity + 1 // increment quantity
          };
        }
        return order; // return other orders unchanged
      }),
    }
  })
});
Looks ugly and confusing. Angular itself does not provide a way to do this, but we can use a library like immer to help us with this. Immer simplifies working with immutable data structures by letting us write code that looks like we're directly modifying an object, array, etc, but behind the scenes, it takes these "mutations" and efficiently produces a brand-new, immutable version of our data without affecting the original object. This means we get the benefits of immutability, such as a more predictable state, without the boilerplate of manually copying and updating nested data structures. It allows us to simple do the following:
import { produce } from 'immer';

state.update((state) => {
  return produce(state, (draft) => {
    draft.product.orderHistory[2].quantity += 1; // increment quantity
  });
});
This quickly becomes very reasonable. Another concern with more complicated properties is that they might be implicitly tied to other properties without that process being handled reactively. For instance, consider the following code:
@Component({
  selector: 'some-component',
  template: `
    <select [(ngModel)]="selectedOption>
      @for (option of options; track option.id) {
        <option [value]="option.id">{{ option.name }}</option>
      }
    </select>
  `,
})
export class SomeComponent implements OnChanges {
  @Input({required: true}) options: {id: number, name: string}[];
  selectedOption = this.options[0]; // default selection

  ngOnChanges(changes: SimpleChanges) {
    if (changes['options']) {
      this.selectedOption = this.options[0]; // reset selection if options change
    }
  }
}
Now, we can see that the selectedOption is implicitly tied to the options input, and if we change the options, we need to reset the selection. This is achieved in a bit of an ugly way here, using the ngOnChanges lifecycle hook as an intermediary between a dependent state and its source value.
With signals, if we convert the options input to an input signal, we can use linkedSignal to reset the option in a reactive manner:
@Component({
  selector: 'some-component',
  template: `
    <select [(ngModel)]="selectedOption">
      @for (option of options(); track option.id) {
        <option [value]="option.id">{{ option.name }}</option>
      }
    </select>
  `,
})
export class SomeComponent {
  options = input.required<{id: number, name: string}[]>();
  selectedOption = linkedSignal({
    source: this.options,
    computation: (options) => options[0]
  }); // reset to first option

  // no need for ngOnChanges anymore
}
As we can see, our component code got only simpler with this, but this also implies some big things: when we start changing our more complex state properties, we may need to also alter our component code, and while those alterations will only be for the better, it is still time-consuming and may even be challenging from time to time.
So, to recap this section, here are steps we need to take when converting complex properties to signals:
- Change a property to be a signal of a value instead of the value itself ('true' -> 'signal(true)')
- Be careful to call the signal in the template as a function:
open->open()whenever necessary - Be careful not to confuse when we do not need to call the signal in the template, like with
[(ngModel)] - Use
.updateinstead of.setwhen dealing with complex properties or when you need the previous value - Consider using a library like Immer to help with very complex updates
- Check our state properties for implicit dependencies and use
linkedSignalorcomputedto handle them reactively - Do all of those steps in an incremental fashion, checking and testing along the way
Now, that we got inputs and state properties out of our way, we can focus on the real heavy-weight: RxJS and signal interoperation.
Migrating BehaviorSubjects
Let's start this section with the most common and easy conversions: BehaviorSubjects. While they're probably not the most common Observables in Angular codebases, they are certainly the easiest to transform to signals.
To understand this, let's quickly remind ourselves what a BehaviorSubject is:
- it is an Observable that always has a value,
- we can read that value at any time.
- we can subscribe to it and perform some side effects when the value changes.
This sounds a lot like a signal, doesn't it? In fact, we can convert a BehaviorSubject to a signal in a very straightforward way:
@Component({
  selector: 'some-component',
  template: `
    <p>Current value: {{ value$ | async }}</p>
    <button (click)="increment()">Increment</button>
  `,
})
export class SomeComponent {
  private value$ = new BehaviorSubject<number>(0);

  constructor() {
    this.value$.subscribe(value => {
      console.log('Value changed:', value);
    });
  }

  increment() {
    this.value$.next(this.value$.getValue() + 1);
  }
}
Now, this BehaviorSubject can be converted to a signal like this:
@Component({
  selector: 'some-component',
  template: `
    <p>Current value: {{ value() }}</p>
    <button (click)="increment()">Increment</button>
  `,
})
export class SomeComponent {
  private value = signal(0);

  constructor() {
    effect(() => {
      console.log('Value changed:', this.value());
    });
  }

  increment() {
    this.value.update(v => v + 1);
  }
}
Now, the steps are simple:
- Change the
BehaviorSubjectto a signal of the same type:new BehaviorSubject<number>(0)->signal(0). - Change the template to call the signal as a function:
value$ | async->value(). - Update the value updating logic to use the signal API:
this.value$.next(this.value() + 1)->this.value.update(v => v + 1). - Change the subscription to an effect:
this.value$.subscribe(...)->effect(() => {...}).
And this is it... for 95% of cases. However, if we are using some operators, especially asynchronous ones, we might need to do a bit more work. For instance, we might want to debounce emissions before we log new values if the user clicks the "Increment" button too fast:
@Component({
  selector: 'some-component',
  template: `
    <p>Current value: {{ value$ | async }}</p>
    <button (click)="increment()">Increment</button>
  `,
})
export class SomeComponent {
  private value$ = new BehaviorSubject<number>(0);

  constructor() {
    this.value$.pipe(
      debounceTime(300) // wait for 300ms before emitting
      takeUntilDestroyed(),
    ).subscribe(value => {
      console.log('Value changed:', value);
    });
  }

  increment() {
    this.value$.next(this.value$.getValue() + 1);
  }
}
Now, let's move on to talk about converting RxJS Observables in general to signals and how to deal with operators we use.
Migrating other Observables
Let's continue with the previous example, and discuss two options we have before we move to chose one of them
- Keep the
BehaviorSubjectas is, and usetoSignalto convert it to a signal when we need it. - Convert the
BehaviorSubjectto a signal immediately and usetoObservablewhenever you need to use RxJS operators
Both options are more or less solid, however the second one has a bit of an edge over the first one, since we would love to have as many signals everywhere we need reactive state, and it is also easier to access in the template or elsewhere (someSignal() vs someBehaviorSubject$ | async and someBehaviorSubject$.getValue()).
So, let's reimagine our previous example while utilizing the toObservable operator to switch to RxJS in order to use operators like debounceTime:
@Component({
  selector: 'some-component',
  template: `
    <p>Current value: {{ value() }}</p>
    <button (click)="increment()">Increment</button>
  `,
})
export class SomeComponent {
  private value = signal(0);

  constructor() {
    toObservable(this.value).pipe(
      debounceTime(300),
      takeUntilDestroyed(),
    ).subscribe(value => {
      console.log('Value changed:', value);
    });
  }

  increment() {
    this.value.update(v => v + 1);
  }
}
Now, as we explored all the cases with BehaviorSubject, let's talk about Observables in general.
Of course, the tool that is the easies to reach out to is the `toSignal operator, however, let's be careful and realize we might not need it all the time. There are two glaring examples, the first is when we are using NgRx (or a similar state-management library that deals with Observables) and the second is when we are using an Observable of an HTTP request.
In the case of NgRx, the lib itself provides a way to get signals instead of Observables, so we can use the selectSignal method to retrieve a signal of the state from a store selector:
@Component({
  selector: 'some-component',
  template: `
    <p>Current value: {{ value() }}</p>
    <button (click)="increment()">Increment</button>
  `,
})
export class SomeComponent {
  readonly #store = inject(Store);
  value = this.store.selectSignal(selectValue); // selectSignal returns a signal

  constructor(private store: Store<State>) {
    effect(() => {
      console.log('Value changed:', this.value());
    });
  }

  increment() {
    this.store.dispatch(incrementValue());
  }
}
Great! No need to bother with toSignal, just use the signal straight away.
Now, if we have an HTTP request, Angular now provides a separate reactive primitive, the httpResource, which handles the entire lifecycle of an HTTP request, like loading state, errors and so on:
@Component({
  selector: 'some-component',
  template: `
    @if (resource.isLoading()) {
      <p>Loading...</p>
    } @else if (resource.hasError()) {
      <p>Error: {{ resource.error() }}</p>
    } @else {
      <p>Data: {{ resource.data() | json }}</p>
    }
  `,
})
export class SomeComponent {
  readonly resource = httpResource(this.#http.get('/api/data'));
}
As we can see, this is super simple, and we are dealing exclusively with signals, no subscriptions, no async pipes, just signals. You can read more about resources in one of my previous articles.
Note:
httpResourcecurrently is meant to work only forGETrequests, and while you can force it to use a differernt method likePOST, it is heavily discouraged, so, for now, we need to find other solutions for the rest of HTTP verbs, as usingtoSignaland so on
So, when do we use toSignal then? Well, let's finally move to the last question we ai mto answer with this article to learn about that.
When should I use signals and when RxJS?
As we noticed throughout the article, signals were usually used as a synchronous but reactive storage for some values, while RxJS was used to handle asynchronous streams of events.
This distinction is very important and useful: always think of signals as data (or state, as we call it), and RxJS as events. This will surely help us correctly identify when to use which.
For instance, consider this:
fromEvent(document, 'click').pipe(
  map((event: MouseEvent) => event.clientX),
  takeUntilDestroyed(),
).subscribe((x) => {
  console.log('Mouse clicked at X:', x);
});
Here, we focus on user generated events and which are inherently asynchronous. Also, there's no concept of "state" or "data" here; we are simply reacting to events. So, this is a perfect use case for RxJS. Of course, we could use the toSignal function here, but what would that signal even be? It will always store the latest click event object, but is that even a useful semantic category? Not really, so we can safely disregard it and just use RxJS here.
However, consider a scenario where we are using some API that returns a state in the form of an Observable (for instance, what NgRx would be if not for the selectSignal method). In this case, we are dealing with a state that is updated over time, and we can use the toSignal operator to convert it to a signal:
this.state$ = toSignal(
  this.store.select(selectState),
  {defaultValue: someDefaultValue}
);
So, we can always use this reasoning to determine whether we need to use signals or RxJS.
Now, one burning scenario might be the one we already discussed: we have a reactive value, not a stream of events, but we really want to apply some (async) RxJS operators to it, like debouncing.
In this case, as already mentioned, it would still be wise to have the value as a signal, since it's simpler to deal with, and then, in some place, convert it to an Observable, apply all the operators you like, and then subscribe to it. This way, we can still use the signal as a source of truth, but also add RxJS niceties to the mix.
Conclusion
Converting a huge Angular app to exclusively use signals is challenging, hard, and daunting task. But of course, it is more than achievable, and, as we saw in this article, can be done in a harmless, incremental way. While you will certainly encounter some complex situations along the way, hopefully this piece will help guide you along reaching your reactivity goals!
Small Promotion

My book, Modern Angular, is now in print! I spent a lot of time writing about every single new Angular feature from v12-v18, including enhanced dependency injection, RxJS interop, Signals, SSR, Zoneless, and way more.
If you work with a legacy project, I believe my book will be useful to you in catching up with everything new and exciting that our favorite framework has to offer. Check it out here: https://www.manning.com/books/modern-angular
P.S If you want to learn more about RxJS interoperability in Angular, or dive deep into signals, check out the 5th, 6th and 7th chapters of my book ;)