

You’ve probably heard the Vue crowd singing praises about Nuxt, and the React folks wouldn’t dare start a project without Next.js. Meanwhile, over in Angular land, we were kinda missing out on that meta-framework magic. Or we did, until Brandon Roberts stepped in with AnalogJS, attempting to bring those same modern features to Angular.
I’d heard about AnalogJS a bunch of times, so as an Angular developer, I had to give it a shot. I rebuilt my personal website, eduardkrivanek.com (shameless plug), switching it from React 😱 to Angular 😎. But slapping together a blog-style app wasn’t enough. I wanted to see if Analog could handle the demands of a full-stack application.
In this post, I’ll walk you through some of the features Analog offers by building an anime search app. Think of this article as a summary of what AnalogJS is capable of. I will go over how I created this small application, but I highly recommend reading the official docs. The presented project is available on GitHub. This example uses Angular 19.2 and AnalogJS 1.15.1. Here is GIF about the final result that we will be.
Getting Started
So, what even is AnalogJS, and why should you care? Well, I’d say it’s worth checking out if:
- You’re building a full-stack app and don’t want separate backend-frontend
- You’re aiming for SSR/SSG-heavy pages and want that SEO optimization
The features which Analog provides (and what I’ll cover throughout this post) are:
- File-based routing
- Route metadata
- API routes
- SSR + SSG rendering
- Form Actions
- Vite (instead of Angular CLI)
- Markdown content support (like Nuxt Content)
- Full-stack capabilities (API + frontend in one)
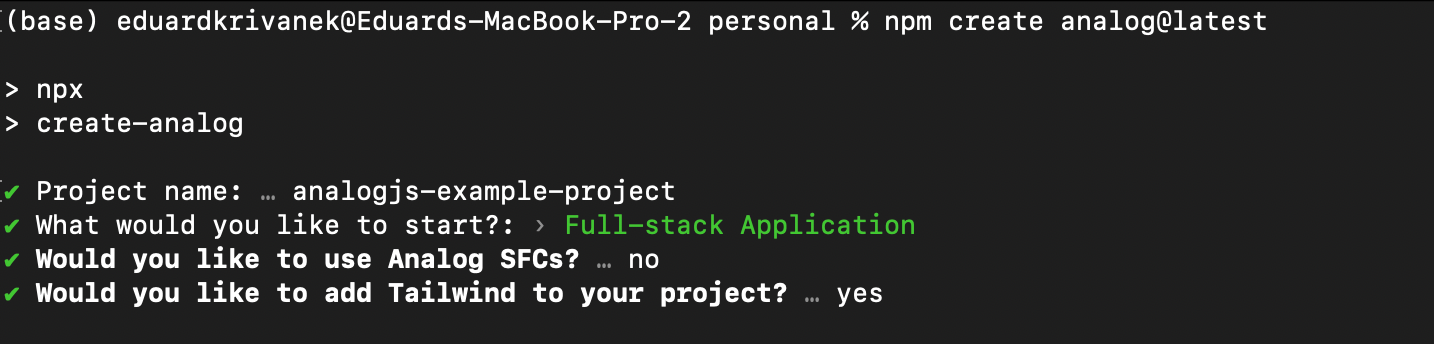
To get started with Analog use the command npm create analog@latest or if you already have an existing project, and want to migrate to analog, you can follow their migration guide.
For my example you will see that I opted-out from Analog’s SFC, which is the “svelte-like” syntax, however this is all personal preference. Another optional thing, in new projects, is removing zonje.js following Angular’s guideline for the best performance.
Application Routing Overview
The example app makes use of all the routing features Analog offers, including static routes, dynamic routes, layout routes, and route groups. We’ll break each of these down in more detail later, but for now, here’s the folder structure we’re working with:
src/
└── app/
    └── pages/
		|── (anime)/
        │   ├── details.[animeId].page.ts
        │   ├── my-list.page.ts
        ├── (auth)/
        │   ├── login.page.ts
        │   ├── login.server.ts
        │   ├── register.page.ts
        │   └── register.server.ts
        ├── (blog)/
        │   └── [slug].page.ts
        ├── (auth).page.ts
        ├── [...page-not-found].page.ts
        ├── index.page.ts
First we start with the main index.page.ts that is served on the initial / route. Next, if the user somehow wanders into a non-existing route, the [...page-not-found].page.ts component will catch all of them. It represents a wildcard ** route.
For authentication, we’ve got login and register pages living inside the (auth) folder. This folder doesn’t change the actual routing, it’s just there to keep things together. We also added (auth).page.ts to provide a shared layout for those two pages. The login.server.ts and register.server.ts files are where form actions happen, but more on those later.
Our blog section is handled by (blog)/[slug].page.ts, which maps to URLs like /blog1, /blog2, and so on. It’s a dynamic route used for rendering content pages.
When someone searches and clicks on an anime, the details appear at /details/123, with 123 being the anime’s ID. This page is public and server-side rendered. Logged-in users can also create their own favorites list at /my-list. Since that’s a private page, it’s rendered entirely on the client side.
Application Routing Detailed
With this section I want to go a bit deeper how each route works, reading route parameters, how to configure rendering and setting metadata.
Static Routes
A route is considered static if there are no square brackets [] in the filename. In our case, the / and /my-list routes are static and look something like this (with a richer template):
@Component({
  template: `<h2>Home Page</h2>`,
})
export default class HomePageComponent {}
What I learnt is that selectors (selector: 'app-home') have no effect on the page components, you can skip them and the component name is also irrelevant. We are using the HomePageComponent name, however you can name it BananaComponent and the final result will stay the same. What actually matters is where the file lives inside the /app/pages folder structure.
Worth to mention to not forget the default keyword when defining a route, otherwise you can get the NG04014: Invalid configuration of route '' error.
Dynamic Routes
Dynamic routes are defined by their filename, where the route param is inside the square brackets. In our example, when a user navigates to /details/123, the details.[animeId].page.ts component kicks in and loads data based on the animeId value.
@Component({ template: `...` })
export default class AnimeDetailsPageComponent {
  private readonly route = inject(ActivatedRoute);
  private readonly animeApiService = inject(AnimeApiService);

  readonly animeDetails = rxResource({
    loader: () =>
      this.route.paramMap.pipe(
        map(params => params.get('animeId')),
        filter((animeId): animeId is string => !!animeId),
        switchMap(animeId => this.animeApiService.getAnimeById(animeId))
      ),
  });
}
Layout Routes
Layout routes are created by setting up a parent file and a child folder with the same name. In our case, we have the (auth).page.ts parent component, and inside the (auth) folder, we have the login.page.ts and register.page.ts pages as its children. To make the layout work, the parent (auth).page.ts needs to include a router-outlet to render its child routes, like this:
@Component({
  imports: [RouterOutlet, RouterLink],
  template: `
    <h2>Auth Layout</h2>

    <button type="button" routerLink="/login">login</button>
    <button type="button" routerLink="/register">register</button>

    <router-outlet />
   `,
})
export default class AuthLayoutComponent {}
Catch-All Routes
This route was defined by [...page-not-found].page.ts, as it represents the wildcard **. The following example is from the official docs:
import { Component } from '@angular/core';
import { RouterLink } from '@angular/router';
import { injectResponse } from '@analogjs/router/tokens';
import { RouteMeta } from '@analogjs/router';

export const routeMeta: RouteMeta = {
  title: 'Page Not Found',
  canActivate: [() => {
      const response = injectResponse();
      if (import.meta.env.SSR && response) {
        response.statusCode = 404;
        response.end();
      }
      return true;
  }],
};

@Component({
  imports: [RouterLink],
  template: `<a routerLink="/">Go Back Home</a>`,
})
export default class PageNotFoundComponent {}
The routeMeta is set up so that if you type a non-existent URL like /nonexistingroute and hit enter, the request goes through SSR by default. But thanks to routeMeta, the server won’t even try to render that page, it just returns a 404 right away. However, if you navigate to a non-existing route from within the app (like via a button click), it falls back to client-side rendering and shows a friendly "go back home" message instead.
Route Metadata
Another great use case for route metadata is SEO and optimizing how your pages appear on social platforms. If you're new to that, the MDN guide on webpage metadata is a super helpful starting point. Here’s a quick example:
export const routeMeta: RouteMeta = {
  meta: [{
      name: 'author',
      content: 'Eduard Krivanek',
    },{
      property: 'og:title',
      content: 'Anime Search',
    },{
      property: 'og:description',
      content: 'Example App about anime search',
  }]};

@Component({ template: `` })
export default class HomeComponent {}
Rendering Strategy
By default, every page in Analog uses SSR to generate content. But Analog also supports SSG, and you can even opt out completely and go with CSR. The SSR vs CSR article is a solid read if you are wondering when to use what.
In our case, we use SSR for the / route, the homepage, since it fetches anime data right away and benefits from that initial server render. The /my-list page, however, is behind an auth wall, so SEO isn't really a concern. That raises the question: “Should I bother with SSR here?” Personally, I’d say no. For dashboard-style pages, CSR usually does the job just fine.
Then we’ve got /login, /register, and all the blog pages. These don’t change often, so they’re perfect candidates for SSG. To achieve this configuration, you’ll need to adjust the plugins section in your vite.config.ts.
  plugins: [
    analog({
      prerender: {
        routes: async () => [
          '/login',
          '/register',
          {
            contentDir: 'src/content/blog',
            transform: file => {
              const slug = file.attributes?.['slug'] || file.name;
              return `/blog/${slug}`;
            },
          },
        ],
      },
      nitro: {
        routeRules: {
          '/my-list': { ssr: false },
        },
      },
    }),
  ],
Worth mentioning that even if you leave some pages to be rendered by SSR, you can still use @defer (on viewport){} to load child components, such as charts, or mainly components which work with DOM, only the client side. For that read more about defer syntax from Angular docs.
Markdown Content Generation
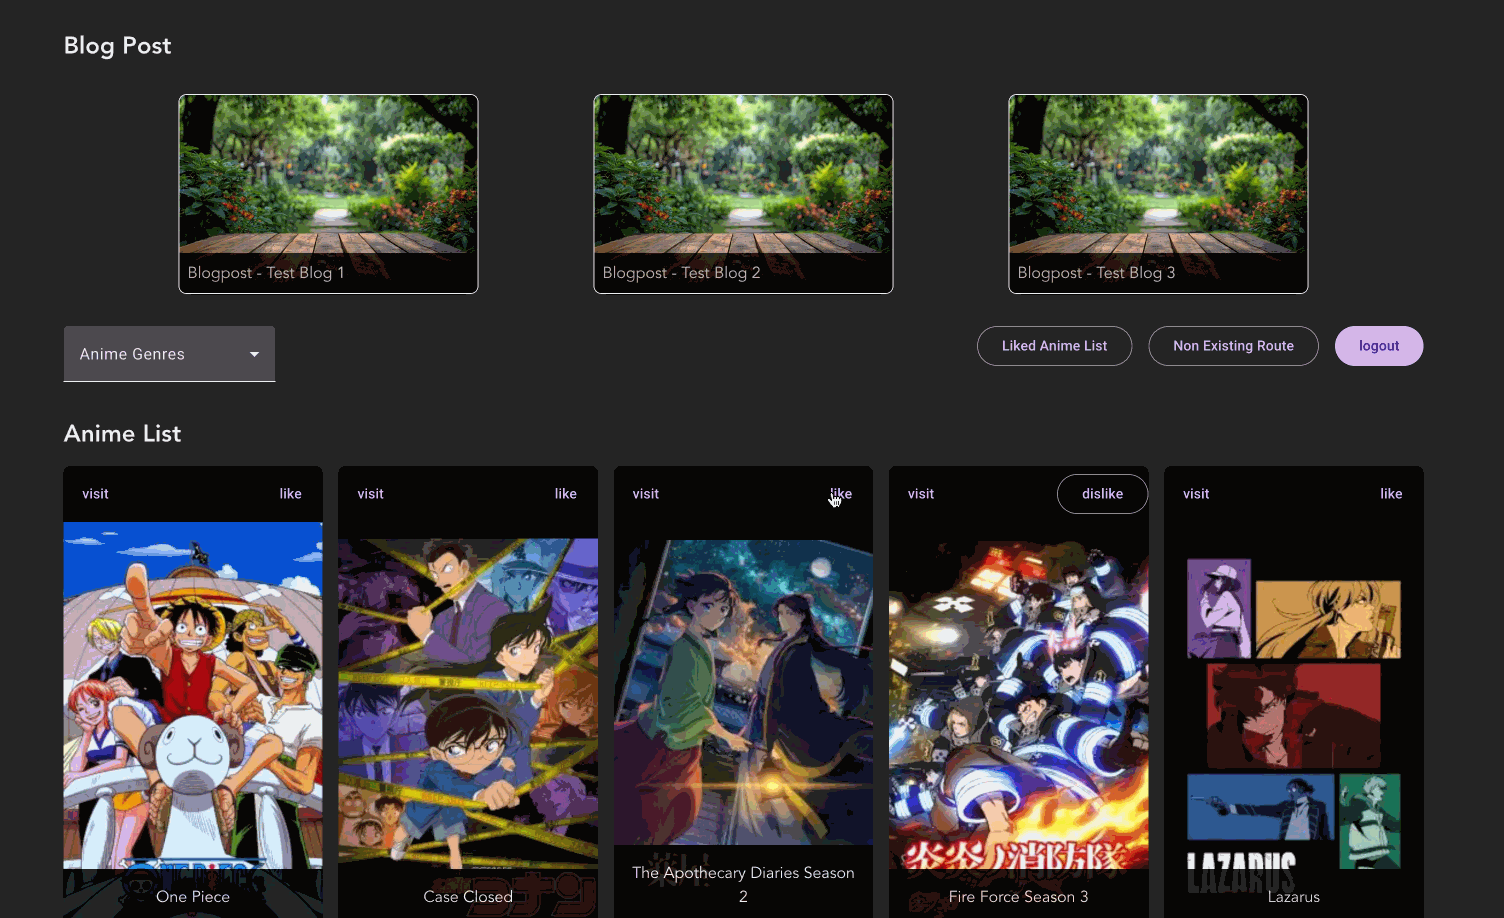
One feature I really appreciate as a blog-posting human is markdown content support in Analog. For our app, we want to display three blog posts, which we’ll store in /src/content/blog. We want to set up routing, render the posts, add formatting, and even dynamic route metadata.
First step it to open src/app/app.config.ts, enable markdown file support, and add a syntax highlighter. You can pick between Prism or Shiki, both are great, but for this example, we’re rolling with Prism.
import { ApplicationConfig } from '@angular/core';
import { provideContent, withMarkdownRenderer } from '@analogjs/content';
import { withPrismHighlighter } from '@analogjs/content/prism-highlighter';

export const appConfig: ApplicationConfig = {
  providers: [
    // ... other providers
    provideContent(withMarkdownRenderer(), withPrismHighlighter()),
  ],
};
When it comes to markdown files (in the /src/content/blog folder), it’s way easier to keep all your blog posts in a single folder, instead of creating a new folder for each post. Before listing out the blogs, you’ll probably want to add some metadata to each file, like this:
---
title: 'Test Blog 1'
tags: angular, rxjs
order: 1
datePublished: 01.01.2024
coverImage: article-cover/background.jpg
---

## Lorem Ipsum

"Neque porro quisquam est qui dolorem..."
You can access the content file list by the injectContentFiles function, that takes a filter where you pass in the location of your content, in our case the /src/content/blog folder.
import { injectContentFiles } from '@analogjs/content';

@Component({
  imports: [RouterLink],
  template: `
    @for (post of posts; track post.attributes.title) {
      <div [routerLink]="['/blog', post.slug]">
        Blogpost - {{ post.attributes.title }}
      </div>
    }
`})
export default class HomeComponent {
  readonly posts = injectContentFiles<{
    title: string;
    tags: string;
    datePublished: string;
    coverImage: string;
  }>(files => files.filename.includes('/src/content/blog'));
}
The post.slug is simply the filename of your blog post. So if a user clicks on test-blog-1.md, they’ll be taken to /blog/test-blog-1, and the blog/[slug].page.ts route will catch and render it.
To display the content of the blogpost, inside the blog/[slug].page.ts route, analog provides the injectContent function and a MarkdownComponent to display the blogpost in a formatted way.
@Component({
  imports: [AsyncPipe, MarkdownComponent],
  template: `
    @if (post$ | async; as post) {
      <article class="prose prose-slate">
        <img [src]="post.attributes.coverImage" />
        <analog-markdown [content]="post.content" />
      </article>
    }
 `,
})
export default class BlogPostComponent {
  readonly post$ = injectContent<{
    title: string;
    tags: string;
    datePublished: string;
    coverImage: string;
  }>({
    param: 'slug',
    subdirectory: 'blog',
  });
}
At this point the markdown may be rendered, but styles will not be applied. To fix that, you need to import prismjs styles. If you’re using Tailwind, you’ll also want to add tailwindcss-typography for that extra polish (and apply the prose css class where you rendered the blogs). Depending on your Tailwind version (mine’s 4+), you’ll need to edit your style.css.
/* Tailwind directives  */
@import 'tailwindcss';

@import 'prismjs/plugins/toolbar/prism-toolbar.css';
/* check node_modules/prismjs/themes/ for the available themes */
@import 'prismjs/themes/prism-tomorrow';

/* highlight text for markdown */
@plugin "@tailwindcss/typography";
Lastly, if you’re heavy on code snippets in your markdown and notice some languages (like SQL, GraphQL, etc.) aren't styled properly, you’ll need to update the vite.config.ts file. Just add them under content.prismOptions.additionalLangs, like so:
// vite.config.ts
export default defineConfig(({ mode }) => ({
  plugins: [
    analog({
      content: {
        prismOptions: {
          additionalLangs: ['yaml', 'sql', 'graphql', 'bash'],
        },
      },
      prerender: { /* ... */ },
      nitro: { { /* ... */ },
    }),
  ],
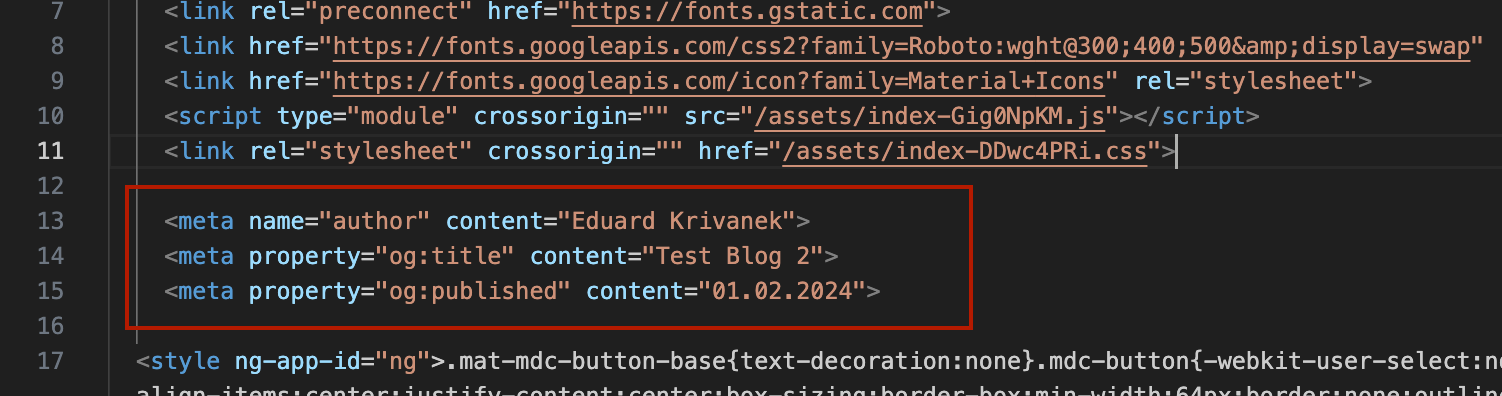
Markdown Content Meta Tags
The blog/[slug].page.ts is a generic component that handles rendering every markdown file living in /src/content/blog. But we also want to add some dynamic meta tags when we prerender these pages for better SEO.
If you want a deeper dive, I recommend checking out Brandon’s example on GitHub. For our case though, we can keep it simple with the following setup:
// src/app/pages/blog/[slug].page.ts
export const routeMeta: RouteMeta = {
  title: 'Blog Post',
  meta: route => {
    const file = injectContentFiles<{
      title: string;
      tags: string;
      datePublished: string;
      coverImage: string;
    }>().find(file => file.slug === route.params['slug'])!;

    return [{
        name: 'author',
        content: 'Eduard Krivanek',
      },{
        property: 'og:title',
        content: file.attributes.title,
      }, {
        property: 'og:published',
        content: file.attributes.datePublished,
      }];
  },
};

@Component({ template: `...`})
export default class BlogPostComponent { /* ... */ }
This configuration will automatically inject the correct meta tags into each prerendered blog page.
API routes
Each app needs a database connection to persist data. In our demo app I mocked this database, but the idea remains the same. We’ve got one singleton service (class) that stores all the application data.
export class Database {
  static instance = new Database();

  storedData = {};

  async createUser(username: string) { /* .. */ }
  async addLikedAnime(username: string, anime: AnimeDetails) { /* .. */ }
  async removeLikedAnime(username: string, animeId: number) { /* .. */ }
}
You’ll access every method via Database.instance.XYZ. Now, what we want to do is create an endpoint based on the HTTP request method. This endpoint will allow us to pass information, like when a user marks an anime as a favorite and wants to keep it in their "favourites" section, then even display it on the (anime)/my-list page.
To create this endpoint, we’ll use the defineEventHandler function. This function will be placed in src/server/routes/api/anime/save-anime.post.ts with the following logic.
One thing to note is the .post suffix in save-anime.post.ts. This suffix tells Analog to create a specific HTTP POST endpoint. If you removed the .post and kept the file as save-anime.ts, this endpoint would accept any HTTP method. In our case, we want to restrict it to just POST requests.
// src/server/routes/api/anime/save-anime.post.ts
import { createError, defineEventHandler, readBody } from 'h3';
import { AnimeDetails } from './../../../api/api.model';
import { Database } from './../../../database/database';

export default defineEventHandler(async event => {
  const body = await readBody(event)
  const id = parseInt(body?.id);
  const username = body?.username;

  // check if id is a number
  if (!Number.isInteger(id) || !username) {
    throw createError({
      statusCode: 400,
      statusMessage: 'Invalid input data',
    });
  }

  // fetch anime details from API
  const response = await fetch(`https://api.jikan.moe/v4/anime/${id}`);
  const anime = (await response.json()) as { data: AnimeDetails };

  // save anime to DB
  await Database.instance.addLikedAnime(username, anime.data);

  // return liked anime to the user
  return { data: anime.data };
});
For POST requests, the readBody function will let you access the message body. If you were using a GET request, you’d use getRouterParam instead. To send data to this backend listener, you’ll need to use HttpClient and target the /api/anime/save-anime URL.
@Injectable({ providedIn: 'root' })
export class AnimeApiService {
  private readonly http = inject(HttpClient);

  saveAnime(id: number | string, username: string) {
    return this.http.post('/api/anime/save-anime', {
      id,
      username,
    });
  }
}
API Route Protection
Analog supports server-side middleware, designed to modify requests, sending redirects or checking for authentication. In our example we can use middleware to setup route protection on every /api/anime route, verifying if user is authenticated. Each middleware run in order defined in the /server/middleware folder.
// /server/middleware/is-logged-in.ts
import { defineEventHandler, getHeader, getRequestURL, sendRedirect } from 'h3';

export default defineEventHandler(async event => {
  if (getRequestURL(event).pathname.includes('/api/anime')) {
    const authToken = getHeader(event, 'authToken');

    // check auth and redirect
    if (!authToken) {
      console.log('User not logged in, redirecting to login');
      sendRedirect(event, '/login', 401);
    }
  }
});
You either add a header to each request or create an interceptor for that, however right now if you target the /api/anime endpoint without the authToken information, you will get the following error message.

Form Actions
Analog comes with form actions, which allow you to handle form submissions directly, without needing a separate HTTP route to process the data (as we did earlier). Instead, the logic is placed right next to the file where the form is submitted.
The FormAction directive, imported from @analogjs/router, gives you access to onSuccess and onError event emitters on the <form> tag. To demonstrate this, we’ll use the (auth)/login.page.ts to handle user sign-in. The client-side component looks like this:
@Component({
  imports: [FormAction, /* .... */],
  template: `
    <form method="post"
          (onSuccess)="onSuccess($event)"
          (onError)="onError($event)">
      <mat-form-field>
        <mat-label>Username</mat-label>
        <input name="username" [formControl]="form.controls.username"/>
      </mat-form-field>

      <button [disabled]="form.invalid">Login</button>
    </form>
  `,
})
export default class LoginComponent {
  readonly form = new FormGroup({
    username: new FormControl('testname', {
      validators: [Validators.required],
    }),
  });

  onSuccess(data: unknown) {
    console.log('success', data as AuthUser);
  }

  onError(result?: unknown) {
    console.log('error', result);
  }
}
To handle form submissions, you create a .server.ts alongside the .page.ts component. So, in our case, the folder structure looks like this:
src/
└── app/
    └── pages/
        ├── (auth)/
        │   ├── login.page.ts
        │   └── login.server.ts
        │   └── register.page.ts
        │   └── register.server.ts
And inside the login.server.ts you may have a logic similar to this
import { fail, json, type PageServerAction } from '@analogjs/router/server/actions';
import { readFormData } from 'h3';
import { Database } from '../../../server/database/database';

export async function action({ event }: PageServerAction) {
  const body = await readFormData(event);
  const username = body.get('username') as string;

  if (!username) {
    return fail(422, { username: 'Username is required' });
  }

  if (!(await Database.instance.getUser(username))) {
    return fail(422, { username: 'Invalid username' });
  }

  return json({ type: 'success', token: 'XYZ', username: username });
}
An interesting thing I noticed is that onSuccess fires when the user authenticates successfully, but the response is always returned as an unknown type. So, if you try to write onSuccess(data: AuthUser) {}, you’ll get an error: Argument of type 'unknown' is not assignable to parameter of type 'AuthUser'. You could validate the data using Zod, or as shown in the example, just cast it to the right type manually.
In the LoginComponent, we used FormGroup to build the form. However, with form actions, this isn't strictly necessary. You just need to display the form fields in the UI, assign a unique name to each one, and when the form is submitted, it will send the data using method="post" to the form handler. The FormGroup was mainly useful for adding validators in this case.
Summary
Overall, my experience with Analog has been a pleasant one. The documentation is well-organized and provides all the necessary information. And if something’s unclear, you can always hop onto their Discord to ask questions or chat with the community.
But the real question is: would I choose Analog for my next project? Right now, it’s tough to imagine the Angular team coming up with a full-stack solution that could outshine Analog. More and more developers are aware of Analog, so I don't think it's going anywhere anytime soon.
If you’re not working on a fully dashboard-style app (where most of the functionality is behind authentication and you don’t want to set up a separate backend like NestJS), Analog is definitely worth considering. It shines in small to medium-sized projects. For large-scale projects, though? Check with the community on the Discord channel.
I hope you enjoyed this article. You can check out the full Anime search example on GitHub. Feel free to share your thoughts, catch more of my articles on dev.to, or connect with me on LinkedIn.